Showing posts with label To Pin. Show all posts

Thursday, July 19, 2012

Flower Balls

One of my best friends is getting married and I have the honor and privilege of hostessing a bridal shower for her. I was equally as excited because I was finally getting to use some party decorating ideas from Pinterest! I looked through my wedding Pinterest board and found my inspiration.

My inspiration:

I loved the cluster of the different types of balls. I have already made the tissue paper balls before, and I knew I could buy some of the paper lanterns. I wanted there to be one more element to the cluster though, and that's when I remembered what a cute clothing boutique by my house had in their display windows. Flower balls! I had asked them how to make them and it was so easy I couldn't believe it! 

No hot glue required!? How can that be so?! IT IS SO!

Here's what you'll need: 


* Fake flowers that'll pull off the stem easily - (I bought 2 bouquets of flowers from Hobby Lobby, each bouquet had about 14-15 flowers on them. The bouquets were originally $11.99 but, flowers were half off that day so I only spent $6 on each bouquet!)
* Straight pins - (Since I was using these to stick in the hole of the flower, I had to make sure the heads of the straight pins were big enough to keep the flower in, I ended up buy a set of 250, size 24 - 1 1/2. I tested them in the store to make sure they would fit perfectly in the flower and not go through the hole.)
Styrofoam ball - (I used a 6 inch floral ball.)
Ribbon if you plan on hanging it

Here's a picture of the underside of the flower so you can see how it is detachable. 

I did this backwards but I would recommend doing this part first. Attaching your ribbon to the ball so you can hang it later. I just double looped the ribbon for added security and pushed it in with a straight pin. 

Now you just detach all the flowers from the bouquet. Then take a flower one by one and stick a straight pin through the hole. You see why the straight pin head has to be bigger than the hole? You can't have it dropping through the hole or they'll serve no purpose!

This is a really quick process and the product is AMAZING!!!

Ta-Da! I hope you enjoy making your flower balls! I am going to make smaller ones too using 3 inch balls but I ran out of flowers. :( Sad day, but I'm going to Hobby Lobby tomorrow to buy more!


And since this is a wedding post... I thought I'd let y'all in on a little secret... one of my dear friends makes homemade invites and they are AMAZING!

If you are in need of invitations from weddings to showers to birthdays and baptism, every order with Simply RSVP is custom-designed around your event theme and made by hand. Whether you need invitations, announcement programs, escort cards, table numbers, thank you cards, etc., each piece will tie your event together elegantly. 


Here's a little snapshot of some previous invites she's done: 


Tuesday, June 12, 2012

Peanut Butter Reese's Pudding Chocolate Chip Cookies

These cookies are a mouthful to say and a mouthful of goodie goodness!


Here is what you'll need: 
* 3/4 cup butter (softened)
* 1/2 cup peanut butter
* 1/2 cup sugar
* 1/2 cup brown sugar 
* 2 eggs
* 1 TBSP honey
* 1 TSP vanilla
* 2 1/4 cup flour 
* 1 TSP baking soda
* 1/2 TSP salt
* 1 small box instant vanilla pudding 
* 1 cup chocolate chips
* 1 cup Reese's Pieces
* 1 cup dried banana chips (broken)

In a bowl combine the flour, baking soda, salt, and pudding mix and set aside for later. 
In a large mixing bowl (I used my Kitchen Aide Mixer) combine butter, peanut butter, sugar and brown sugar until fluffy. Add the eggs, vanilla, and honey and beat again until completely mixed. 
Slowly add the dry ingredients, a little at a time. Not all at once. 
Stir in the chocolate chips, Reese's, and banana chips by hand with a spoon.

Drop by spoon onto a baking sheet, leaving about 2 inches in between each cookie. Bake at 350 degrees for about 14 minutes. Cool on pan for 3-4 minutes, then remove to a wire rack. Store in a tightly covered container. Makes about 36 cookies.


Combine the flour, baking soda, salt and pudding mix. Set this aside for later. 

Then I used my wonderful Kitchen Aide Stand Mixer to mix the next set of ingredients. Beat together the butter, peanut butter, sugar and brown sugar until fluffy. 

((These little 1/4 cup packages by Imperial Sugar are AMAZING! No measuring cup required... I just needed two of these 1/4 cup packages to get my 1/2 cup of brown sugar needed for this recipe!))

Oh that's just Duke... waiting patiently to have a lick of batter. :0

Ok... back to the cookies. Here is my mixer beating together the butter, peanut butter, sugar and brown sugar .

Next, add in the vanilla, honey and eggs. 

Now slowly add the dry ingredients that you set aside earlier. Turn your mixer on the slowest setting and using a spoon gently scoop the dry ingredients into the mixer bowl. 

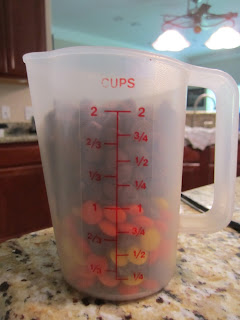
Once you're done beating together all the ingredients, measure out your cup of Reese's Pieces and your chocolate chips. I just put them in one measuring cup. You are going to mix these in BY HAND (with a spoon) don't use your mixer for this part. (OH I left our the banana chips.. but you can add them )


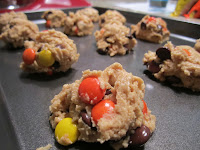
Ta-Da! And they really really are amazing!

This recipe is definitely a pin!!!


Here is the pin where I found this recipe. This lady made up herself!
http://pinterest.com/pin/241787073714747508/

Monday, May 14, 2012

Chuy's copycat green sauce

Chuy's is on of my favorite places to eat.. mainly because of their creamy jalapeno sauce. If you haven't had a chance to go to a Chuy's or don't live near one (It's a TEXAS food chain).. I have the perfect copy cat recipe so you can enjoy at home. What's even better is this is literally the simplest recipe I've ever come across in my entire life. It is also the BEST dip you've ever tasted. Your mouth will thank you. It has a little kick but you can add less jalapenos to soften the kick. You'll want to put this on everything... enchiladas, tacos, chips (specially the HINT OF LIME chips), hamburgers, cereal...


Here is what what you'll need: (if it's just you or if you just want to experiment to see if you like it, I recommend you half everything because it makes a pretty big batch.)

*1 quart mayo
*1 cup buttermilk
*1 cup jalapenos (I used jarred but I'm switching to fresh the next time I make it. I also add a little juice.)
*1 cup tomatillo sauce (I found mine at Kroger BUT they aren't going to carry it anymore so try H.E.B.!)
*1/2 bunch of cilantro (The recipe I found said chopped but I didn't chop)
*3 packs dry ranch mix

1 quart is equal to 4 cups. I bought the regular jar of Mayo and a small squeezie jar. The jar won't have enough Mayo.. it only has about 3 and a half cups so I just squeezed some out of the other jar to help bring it up to 4 cups. 

You'll find buttermilk by the milk :)

Pushing the cilantro in. This is my favorite part because cilantro is the heart of all good foods. This is also the part we noticed that we were going to overflow our 7 cup blender. So, we poured HALF of what we already had in the blender (mayo, buttermilk and cilantro) into a bowl. At the end we would pour the other half into that bowl and whisk feverishly for a few minutes. 

1 cup of jalapenos with a little of the juice. 

1 cup of tomatillo sauce. Don't forget to look at H.E.B. for this NOT Kroger!

Opps! Clean up on isle 4!!

Since we were in such a tizzy after spilling the tomatillo sauce I forgot to take a picture of us adding the ranch dry mix! But go ahead and add that in at this time. 

THEN -- pulse/blend for about 5 minutes. It's noisy but worth it!

Now remember I told you we poured half out into a bowl? Now after you pulse/blend for 5 minutes add that to the half you might have had to pour out (if your blender is big enough then you don't have to worry) Here I am about to start whisking my little heart out! I whisked for just a few minutes until I saw everything was nice and blended. 

NOW THE BEST PART!!

I promise this will be a hit anytime you make it. I made it for my graduation party (the whole recipe) and it was gone in about an hour. So I hope you enjoy and if you have any questions feel free to comment and I'll be as helpful as possible :) 

This one is DEFINITELY a pin!  

Thursday, March 15, 2012

Easter Cupcake Cups Topiary

Spring Break! Yay! Here is a cute little Easter topiary for you Easter table!

What you'll need: 
* Hot gun/glue
* Paint
*5/16 x 36 dowel ( I cut mine into 8 inch sticks)
* two 3in. Styrofoam balls 
*2 1/2 inch cupcake cups (I bought packs of 36 and used about 5 packs. Luckily they each cost less than a dollar!)
* cup/can
* Filler of your choice. (Easter grass/gemstones/shredded color paper)

To cut my dowel into 8 inch sticks I just cut around and around with a pair of scissors, then it made it easy to just snap in half! MUCH easier than any other method I could think of! Next, I painted my sticks white.

THEN I pushed the 8 inch stick into the Styrofoam ball about one inch. After I had made the hole I took the dowel out and put a lot of hot glue on it, then I replaced the stick into the hole I just made and pushed hard. These made sure the stick was really secure in the hole and wouldn't come out while I was putting the cupcake cups on it.

I feel like these cupcake cups are sad they aren't going to get to hold a delicious treat! It is way easier to go ahead and lay out as many cupcake cups as possible before you start. That way you can grab, glue and place a lot faster!

Using another dowel I had, I pushed the cupcake cup onto the flat side of the dowel and put a spot of hot glue onto the cupcake cup. 

Then I quickly pushed it onto the Styrofoam ball. I didn't keep the ball there between my knees while I was putting the cupcake cup onto it, that was just for picture purposes. I had to actually hold the Styrofoam ball with my hand to make sure that I securely put the cupcake cup onto the Styrofoam ball. 

Looks like a dress!
It's growing!
Yay! I'm getting there!!
So close!!!
Pushing the final cupcake cup onto my Styrofoam ball! YES! 

Next, I placed the other half of my 8 inch stick into another same sized Styrofoam ball, THEN I got lucky. I figured out the cupcake cup plastic container fit the other Styrofoam ball in it perfectly! 

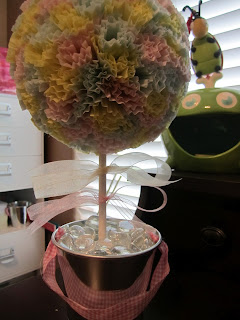
Then I just placed the cup into the metal bucket! I saw other people using Easter grass or shredded paper to hid this part that sits inside the bucket, but I didn't have those things.. so I just used my leftover gemstones to  hide all that. They also kept everything pretty sturdy in place in the bucket so nothing tipped over.

Whale and Ladybug are so impressed! I added two ribbons around my 8 inch stick

oOo I love pastels!


This one is DEFINITELY a pin! 

** Plus, you can do it for any holiday with any colored cupcake cups, just use different colors!!! **