Showing posts with label Ornaments. Show all posts

Thursday, December 22, 2011

Applesauce Cinnamon Ornaments

I saw this while browsing Pinterest last night and I remembered a first grade class doing it once and how DELICIOUS it smelled! I could even smell it down the hallway! The best part is that this is NO BAKE! I mean you really can't mess this up!

You'll need:
  • 3/4 cup Applesauce
  • 4 oz. Ground Cinnamon
  • Wooden rolling pin and cutting board
  • Mixing bowl
  • Cookie cutters
  • Straw
  • Knifes/Thin spatula
  • Cooling rack
Measure out 3/4 cup of applesauce and put into a mixing bowl.  Then dump in your ground cinnamon.
^^ It's a mountain! ^^

Now it's time to mix it all up! Except I came upon a problem, it wasn't mixing well! Oh no.. who knows what to do!? (If you have read 'King Bidgood's in the Bathtub by Audrey & Don Wood you'll understand!)
I knew what to do....
^ See now the texture was just right. Everything was mixed in perfectly! ^


So then I rolled it out. This is how I rolled it out...
And this is how Meme rolled it out...

Now it's time to get to cuttin'!
^ Meme making sure the ornaments are smooth on top. ^

Oh... how'd I get those little holes at the top of my ornaments? Like this...
^^ Just poke your straw through and twist.. the circle might not come out but that's ok because when you lift them off the cutting board you can push the straw through again or it might just fall out!

Let's talk about lifting these babies off the board... I read off the original posting that she used a spatula. WELL that just wasn't working for us...
The spatula was misshapping our ornaments!

 
Then... Meme had an idea...
And it worked perfectly!!

Now lay them on your cooling rack...

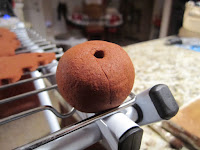
 This was a ball we made of the leftovers, we punched a hole all the way through.

So now... it's time to wait and see if they harden! I broke this project up into two postings. So you'll have to wait and see what they turn out to be tomorrow! That is if they are dry, I finished them at 10:15pm central time. I will be checking them through the day tomorrow. It is recommended at least a day before adding the ribbons and date on the back. But so far...

This one is DEFINITELY a pin!


Wednesday, December 21, 2011

Glittery Ornaments using Mop N Glo

Alright now we're talking.. my Mod Podge ornaments obviously didn't turn out too well. So, I went and bought the Mop N Glo to experiment with its quality. Boy --- talk about an improvement!

Here is where I orignally saw the ornaments being made with Mop N Glo:


My Version

What you'll need:
  • Mop N Glo
  • Clear glass ornaments
  • Glitter
  • Measuring cup
  • Ribbon (optional)
At first I tried tipping the Mop N Glo into the ornament and after a big mess decided that it would be easier to pour the Mop N Glo into a measuring cup THEN pour from the measuring cup into the ornament :)
Then you can easily pour it back into the measuring cup and reuse what is left in the measuring cup for your next ornament!

**NOW this is where the going got a little tough and I almost lost hope. You have to quickly dump the left over Mop N Glo out and pour in and shake your glitter. We waited a few seconds too long on the first ornament and the glitter doesn't stick around as well as if you did it more quickly. It just dries too quickly on the inside after being poured out. So this part is a quick process. On the last ornament most of the glitter stuck to the bottom of the ornament. (That is because I insisted on taking a super quick picture. Oops!)

If you want to add a little extra sparkle, you can tie on ribbons to hang on your tree. Meme is good at the ribbon tying so I let her do this part.

^^^These are my Mod Podge balls next to my Mop N Glo balls. I'll let you decide which ones look better. ^^^

Now they are beautifully hung on the tree by Meme!


This one is DEFINITELY a pin!

Monday, December 19, 2011

Glittery Ornaments using Mod Podge

While browsing Pinterest.. I noticed beautiful glass ornaments people had made mixing Mop N Glo and glitter, mixed together on the INSIDE. How perfect I thought.. the glitter won't be falling off all over the place plus it'll last through the attic during the off season. So that was what I was going to present to y'all tonight. Well, after going to Hobby Lobby and Kroger, I had forgotten my Mop N Glo. I didn't want to disappoint so I thought I would sub out the Mop N Glo for Mod Podge. Here is what I got.


What you need:
  • Glass ornaments (They are currently half off at Hobby Lobby!)
  • Baggie (cut the end and poor your glitter through there. I didn't need to but just in case!)
  • Glitter
  • Mod Podge (maybe..)

So I took the top off my ornament and poured in my mod podge. (Actually my mom poured it in and I took a picture :) )

Then we shook it all around until the inside of the ball was evenly covered.

If there is a little excess mod podge inside, you can pour it back into the bottle. That was what was recommended with the Mop N Glo version too.

Now time to pour the glitter in!


Shake it all about until all that glitter is evenly coated inside your ball!

Annnnnd this is what it'll look like:

It's safe to say these did not turn out as beautiful as the Mop N Glo version. So, tomorrow I am going to retry this but with the Mop N Glo. I don't like this verison at all, the mod podge is all chunky on the inside, it took forever to evenly coat the inside with both the mod podge and glitter. I'm giving this a thumbs down.

This made me CRINGE!!