Showing posts with label Ribbon. Show all posts

Thursday, March 15, 2012

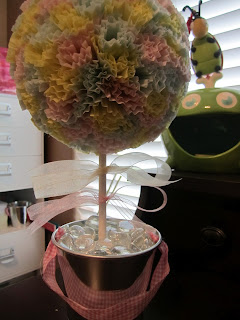
Easter Cupcake Cups Topiary

Spring Break! Yay! Here is a cute little Easter topiary for you Easter table!

What you'll need: 
* Hot gun/glue
* Paint
*5/16 x 36 dowel ( I cut mine into 8 inch sticks)
* two 3in. Styrofoam balls 
*2 1/2 inch cupcake cups (I bought packs of 36 and used about 5 packs. Luckily they each cost less than a dollar!)
* cup/can
* Filler of your choice. (Easter grass/gemstones/shredded color paper)

To cut my dowel into 8 inch sticks I just cut around and around with a pair of scissors, then it made it easy to just snap in half! MUCH easier than any other method I could think of! Next, I painted my sticks white.

THEN I pushed the 8 inch stick into the Styrofoam ball about one inch. After I had made the hole I took the dowel out and put a lot of hot glue on it, then I replaced the stick into the hole I just made and pushed hard. These made sure the stick was really secure in the hole and wouldn't come out while I was putting the cupcake cups on it.

I feel like these cupcake cups are sad they aren't going to get to hold a delicious treat! It is way easier to go ahead and lay out as many cupcake cups as possible before you start. That way you can grab, glue and place a lot faster!

Using another dowel I had, I pushed the cupcake cup onto the flat side of the dowel and put a spot of hot glue onto the cupcake cup. 

Then I quickly pushed it onto the Styrofoam ball. I didn't keep the ball there between my knees while I was putting the cupcake cup onto it, that was just for picture purposes. I had to actually hold the Styrofoam ball with my hand to make sure that I securely put the cupcake cup onto the Styrofoam ball. 

Looks like a dress!
It's growing!
Yay! I'm getting there!!
So close!!!
Pushing the final cupcake cup onto my Styrofoam ball! YES! 

Next, I placed the other half of my 8 inch stick into another same sized Styrofoam ball, THEN I got lucky. I figured out the cupcake cup plastic container fit the other Styrofoam ball in it perfectly! 

Then I just placed the cup into the metal bucket! I saw other people using Easter grass or shredded paper to hid this part that sits inside the bucket, but I didn't have those things.. so I just used my leftover gemstones to  hide all that. They also kept everything pretty sturdy in place in the bucket so nothing tipped over.

Whale and Ladybug are so impressed! I added two ribbons around my 8 inch stick

oOo I love pastels!


This one is DEFINITELY a pin! 

** Plus, you can do it for any holiday with any colored cupcake cups, just use different colors!!! **

Monday, January 2, 2012

Ribbon Pomander

 Here is what you'll need:
* Different widths of ribbon in different colors
* Styrofoam ball
* Stick pins
*Scissors

Cut your ribbon into 4 inch strips. I cut 10 strips of each color just to get started.

Now to get them ready to pin to your Styrofoam ball, you have to twist each piece of 4 inch ribbon into a circle.

Next, using your stick pins attach the ribbon (that's still in the circle you formed) to the Styrofoam ball. Where I found this I saw she used one stick pin, when I used one stick pin the ribbon moved around too much and sometimes became misshaped. I recommend using 2 - 3 stick pins to really keep your ribbon secure to the spot you want it.

Then keep twisting and pinning!

Maybe watch your favorite TV show while you do this...

Just keep alternating your ribbon. You can really use any size ribbon or texture.

Ta-Da! You could find some way to hang them from a ceiling, or sit them on top of upside down wine glasses for centerpieces.

This one is DEFINITELY a pin!


Here is the original I found on Pinterest:

Saturday, December 24, 2011

Bow hanger frame

I just want to let y'all know from the beginning how much I LOVED how this project turned out. It was time consuming, you aren't going to finish this in an hour but, it was worth 100% of the time I put into it.

You'll need:
  • A wooden frame with no glass. They are usually at Hobby Lobby. Mine was a 11x14.
  • Ribbon. My ribbon was an inch and a half.
  • Cup hooks. You will get a better deal at a Home Depot/Lowes. Mine were a pack of 50 and were one inch.
  • Ruler
  • Hot glue gun and glue
  • Sharpie
  • Spray Paint. I used Ballet Shoes. It dried in 10 minutes or less.
  • Embellishments
First you have to screw all those cup hooks into the bottom of your frame. I used my ruler and sharpie to make a one inch mark between each hook. You can do more or less,  I ended up with a total of 17 on the bottom of mine.

 I'm just letting you know this was a TOUGH job. To help screw them in I layed the frame on the ground and secured it between my legs. Then using both hands I pushed down and twisted each screw into the wood. When I only had 6 more left my dad helped me by drilling small holes into the wood where I had marked with my sharpie and ruler. This helped TREMENDOUSLY! 

Once you have all your hooks in, it's time to spray paint!
Before:  
After:


Once your frame is completely dry, it's time to cut the ribbon and place them where you want. I didn't measure the space between them, I just eye balled it. I also cut the ribbon a little long because I was going to glue the ribbon into that inside crevasse.


When securing the ribbon to the frame I wanted to push down hard so the ribbon would adhere to the hot glue, so I used the edge of my scissors to push down hard, instead of burning my fingers.

When it's time to attach the other side of the ribbon, make sure you pull it tight so it's taunt.

I'm basically done with the frame... I just need to add a few embellishments to make it complete!


All finished!!!

This one is DEFINITELY a pin!

Here is the original I found on Pinterest: